Choosing Between Individual Cut Stickers and Sheet Labels
Deciding on the right adhesive product starts with knowing how you plan to hand out or apply your graphics. If you need promotional swag to distribute one by one at events, individually separated stickers with backing paper trimmed to match the artwork are typically the most convenient format. Conversely, if your goal is to seal hundreds of shipping cartons or apply branding to retail boxes in rapid succession, stickers supplied on flat sheets or continuous rolls will save substantial handling time.
Individual cut stickers come primarily in two styles known throughout commercial print shops as die-cut and kiss-cut. A true die-cut format trims through both the printed face film and the release liner underneath, leaving a finished piece that matches the exact silhouette of your artwork. A kiss-cut format slices only through the vinyl layer while preserving a larger rectangular paper backing, which provides extra border space to print branding, social media handles, or web addresses.
Sheet layouts remain the standard choice for return envelope labels, packaging seals, and small office tasks. Because multiple stickers sit together on an eight-and-a-half by eleven-inch backing sheet, peel-and-stick application moves very quickly without having to discard dozens of individual backing pieces. Print shops print these using high-resolution digital production presses, allowing sharp typography even on tiny address text that might become illegible on lower-grade desktop printers.
Your decision ultimately hinges on manual labor versus distribution style. Promotional giveaways almost always demand individual pieces that look clean and intentional in a customer's hand. High-volume logistical needs, such as warehouse shipping or bulk holiday card mailings, benefit from sheet or roll formats that keep per-unit costs lower and application speeds significantly higher.
How Die-Cut Contours and Cutting Plotters Operate
A die-cut sticker does not rely on traditional metal stamping dies in modern short-run print environments. Instead, digital vinyl cutters and flatbed routing tables use precision carbide blades guided by vector paths created in design software. The cutting blade moves along the designated digital perimeter with calibrated downward pressure, slicing cleanly through the vinyl, adhesive layer, and heavy paper backing without crushing the printed graphic or leaving jagged, frayed edges.
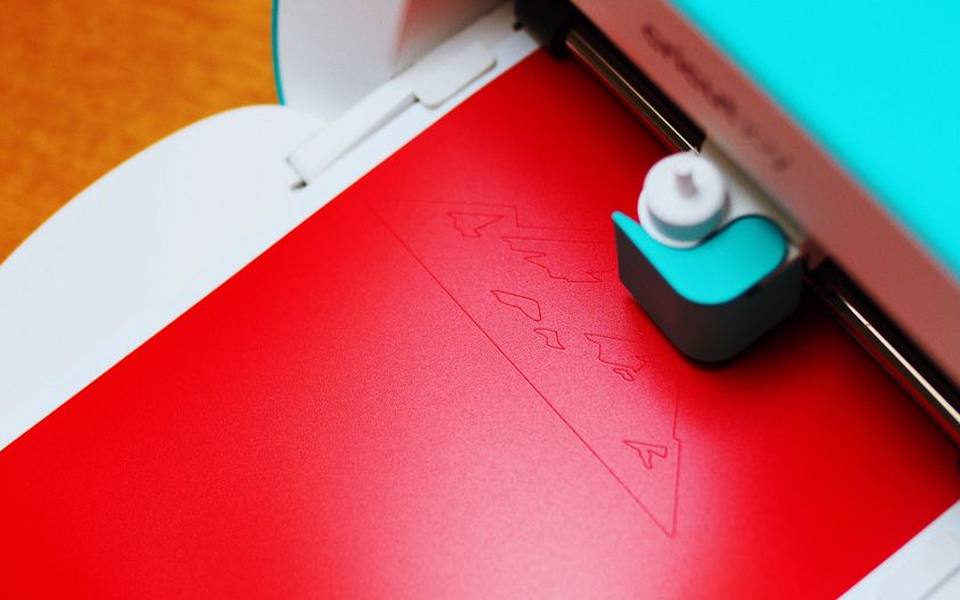
Creating a proper cut line requires drawing an uninterrupted vector outline around your artwork, often referred to as a cut contour or die line. Professional pre-press departments generally prefer this path to be saved as a separate spot color swatch named CutContour, layered directly over the visual design. When the digital print file loads into the shop's computer-aided cutting software, the machine recognizes the stroke data as a cutting instruction rather than visual artwork.
The contour line can follow the exact outline of your graphic or include an offset border, which is typically white or clear. Adding an offset border of roughly one-sixteenth to one-eighth of an inch prevents slight mechanical shifts during the cutting phase from shearing into your core design. It also gives the finished item a polished, professional border that separates the artwork visually from whatever background surface it eventually adheres to.
Understanding this cutting tolerance helps prevent common disappointment when opening a box of custom stickers. Slight movement of paper and vinyl rolls during high-speed cutting is a normal physical reality in commercial printing. Providing adequate bleed margins beyond your cut path ensures that every single finished piece looks uniform, sharp, and centered.
Vinyl Substrates and Outdoor Durability
Standard paper stickers perform well on dry indoor surfaces like notebooks and envelope flaps, but outdoor applications demand durable synthetic substrates. Custom vinyl stickers are manufactured from polyvinyl chloride films coated on one side with an acrylic pressure-sensitive adhesive. Commercial print providers typically offer two main grades of vinyl: intermediate calendared vinyl for flat, rigid placements and high-performance cast vinyl for irregular surfaces.
Calendared vinyl is produced by rolling molten plastic through heavy heated rollers, leaving a thick, sturdy material that resists minor scuffs and holds vibrant ink. It works exceptionally well for personal decals, water bottles, laptop cases, and storefront window promotions. For heavy vehicle graphics or prolonged exposure to road salt, cast vinyl delivers longer outdoor resilience, sharing materials often handled by shops that specialize in vehicle wrap printing and installation across commercial fleets.
Outdoor durability relies heavily on the protective overlaminate applied over the fresh print. Ultraviolet radiation from direct sunlight degrades inkjet dyes and pigments over time, causing vibrant reds and yellows to fade into dull tones. A clear polyester or vinyl overlaminate acts as a physical shield against UV rays, rain, scratching, and dishwashing cycles, keeping the graphic legible and intact for years under normal weather conditions.
When purchasing personalized vinyl stickers, confirm whether the shop utilizes eco-solvent, latex, or UV-curable inks. Latex and UV printing methods cure instantly during production, yielding strong scratch resistance right off the machine. Solvent inks penetrate deeply into the plastic substrate, providing superb color depth and water resistance, provided the vinyl is given adequate time to outgas before the protective laminate is laminated on top.
Return Mailing Labels and Envelope Organization
Return envelope labels serve a practical, daily purpose for households, small business correspondence, and formal event invitations. Instead of handwriting a return address repeatedly, pre-printed labels ensure postal carriers can read sending information clearly, reducing delayed or misrouted mail. Address sheets can be styled with modest typography, small line-art logos, or decorative borders that match the stationery tucked inside the envelope.
For standard postal letters, a lightweight matte or semi-gloss paper stock with permanent acrylic adhesive is ideal. Gloss paper offers sharp visual contrast for small dark fonts, while uncoated matte paper allows you to write additional notes or tracking codes with a standard ballpoint pen if necessary. Because postal sorting machinery moves mail through mechanical belts at high velocity, label edges must bond firmly to envelope paper without lifting or snagging.
While specialized online services print these by the thousands, local print facilities often produce them on demand with very fast turnarounds. Many walk-in shops provide convenient access to a self-service printing kiosk or front-counter production where you can print short runs of address labels directly onto standard multi-up adhesive sheets using provided layout templates.
Choosing between individual rolls and flat sheets for mailing labels depends largely on the volume you process each week. Hand-applying a dozen return mailing labels is straightforward with flat sheets stored neatly in a desk drawer. If your daily business routine involves dozens of parcel dispatches, roll-fed labels paired with a manual desk dispenser dramatically speed up packing table workflows.
Packaging Labels for Jars, Bottles, and Retail Boxes
Product packaging labels bridge the gap between creative visual branding and strict practical demands. A sticker applied to a chilled beverage can, cosmetic lotion bottle, or candle jar must endure moisture, friction, and shifting temperatures without peeling, bubbling, or running ink. Selecting the right adhesive and face stock depends entirely on what the container holds and how customers interact with it.
Biaxially-oriented polypropylene, commonly called BOPP, is the industry standard for consumer product packaging. BOPP offers complete resistance to water, vegetable oils, and mild chemical solvents, making it ideal for bath goods, salad dressings, and chilled food containers. It flexes smoothly across cylindrical glass or plastic bottles without wrinkling, maintaining its hold even when condensation builds up on the exterior during refrigeration.
For products that lean into an artisanal or organic aesthetic, such as roasted coffee bags or handmade paper crafts, textured kraft paper and linen stocks provide a tactile, earthy presentation. These paper stocks lack the water resistance of synthetic films, but they absorb rich ink palettes beautifully and can be paired with moisture-resistant chill adhesives if modest cold storage is anticipated.
When ordering packaging labels in bulk, ask your print technician about roll unwind directions if you use an automated labeling machine. Automated labelers require the roll to feed off the core in a specific orientation—top-edge first, bottom-edge first, or side-edge first—to ensure labels apply upright onto containers without costly manual realignment.
Setting Up Artwork, Bleeds, and Cut Lines
Clean, high-resolution source files are essential when preparing artwork for custom sticker printing. Commercial digital printers reproduce fine detail best when digital raster graphics are supplied at three hundred dots per inch at final print scale. Supplying low-resolution web graphics pulled from internet browsers inevitably leads to pixelated edges, blurry text, and disappointing print proofs.

Vector file formats such as EPS, SVG, or native PDF documents represent the gold standard for sticker artwork. Because vector assets rely on mathematical paths rather than fixed pixel grids, graphics can scale cleanly to any size without losing crispness. Vector formats also make it simple for pre-press technicians to generate the necessary cut lines around complex typography or intricate character illustrations.
Bleed margins are mandatory whenever color extends all the way to the outer perimeter of your cut sticker. In professional sticker manufacturing, a bleed margin of roughly one-eighth of an inch allows the background artwork to extend past the designated cut path. If the digital blade shifts slightly to one side during cutting, the blade still slices through printed ink rather than exposing an unintended sliver of raw white vinyl backing.
Color management also requires care when transitioning from computer screens to physical adhesive prints. Digital monitors display colors using RGB light channels, whereas commercial printers lay down CMYK ink pigments. Converting your artwork to CMYK color mode before submitting the file helps identify out-of-gamut bright neon shades that may reproduce somewhat darker or flatter on physical adhesive media.
Selecting Finishes from High Gloss to Holographic
The protective laminate you select plays a substantial role in the visual personality and tactile feel of your finished sticker. High-gloss finishes maximize color saturation and deep contrast, making vibrant cartoon designs, bold typography, and photo-based artwork pop under bright light. Gloss laminates also deliver a slick, reflective surface that sheds water droplets effortlessly in outdoor environments.
Matte laminates offer an understated, glare-free aesthetic that has gained immense popularity for modern lifestyle branding and art prints. A matte surface diffuses ambient light, making intricate designs easy to inspect from any viewing angle without harsh reflections. High-end velvet or soft-touch matte laminates provide a distinct suede-like texture that feels premium to the touch, often favored for craft product packaging.
Beyond standard clear laminates, specialty substrates can elevate standard designs into striking collectors' pieces. Holographic vinyl reflects an iridescent rainbow shimmer beneath your artwork, turning metallic highlights and futuristic graphics into eye-catching novelties. Clear transparent vinyl allows background colors or glass containers to show through unprinted areas, creating a seamless screen-printed appearance on smooth surfaces.
When printing on clear or holographic vinyl, commercial printers utilize dedicated white ink channels behind selected portions of the design. Because standard process inks are naturally translucent, printing a solid opaque layer of white ink underneath your colored artwork blocks out the background, keeping colors solid and legible while allowing surrounding areas to retain their metallic or transparent effects.
Sourcing Prints Locally Versus Shipping Online
Finding the right provider depends on your project deadline, budget, and preference for personal proofing. Large online sticker manufacturers excel at producing large runs of standard die-cut shapes at competitive per-unit prices, but shipping times can introduce delays if you are working against a tight event schedule. Ordering locally allows you to inspect physical paper swatches, touch vinyl textures, and verify color proofs in person before running a full order.
Metropolitan regions feature extensive commercial print networks capable of rapid turnarounds. Whether you are consulting print specialists across Places to Print in California or working directly with neighborhood shops in Places to Print in New York, local printers can often process emergency decal runs within twenty-four to forty-eight hours when files are properly prepared.
Local shops are also far better positioned to handle unconventional custom requests that do not fit into standardized web forms. If you require specialty metallic foils, specific pantone spot color matching, or unique combinations of split backing sheets, sitting down with a commercial estimator ensures every production specification is understood before ink touches vinyl.
No matter where you choose to print, reviewing an electronic or physical proof is non-negotiable. Check every element carefully, including phone numbers, spelling on return mailing addresses, bleed allowances, and the precise placement of the cut line around delicate illustration details.
Proper Surface Preparation and Application Techniques
Even the highest-grade vinyl sticker will fail prematurely if applied to an unprepared, contaminated surface. Dust particles, skin oils, road grime, and residual manufacturing wax create a physical barrier that prevents pressure-sensitive adhesives from forming a continuous bond. Taking a few minutes to clean the substrate thoroughly ensures your custom vinyl decals stay anchored for years.
The ideal cleaning solution for most non-porous surfaces is a simple mixture of seventy percent isopropyl alcohol and water applied with a lint-free microfiber towel. Avoid household glass cleaners that contain ammonia or wax additives, as these leave microscopic residues behind that actively degrade sticker adhesives. Wipe the area thoroughly and allow the surface to dry completely before beginning peel-and-stick application.
For larger custom vinyl stickers or complex lettering, utilizing transfer tape and the hinge method prevents wrinkles and crooked placement. Secure the top edge of your sticker assembly to the surface with painter's tape, peel away the backing paper halfway from underneath, and use a firm felt-edge squeegee to smooth down the exposed vinyl starting from the center outward toward the edges.
Ambient temperature also dictates how readily acrylic adhesives bond during installation. Most sticker manufacturers specify an application temperature range typically between fifty and eighty-five degrees Fahrenheit. Applying decals onto freezing car windshields or scorching metal surfaces prevents the adhesive from wetting out properly, frequently resulting in curling corners and trapped air pockets.
Troubleshooting Peeling, Bubbles, and Adhesive Residue
Bubbles occasionally emerge during sticker application when air gets trapped between the vinyl film and the underlying surface. If small bubbles appear on standard vinyl, you can gently pierce the outer edge of the bubble using a sharp pin or utility blade tip, then press down with your thumb to push the trapped air out through the puncture without leaving a visible scar on the print.
Premature edge lifting, commonly known as flagging, occurs when a sticker is applied over steep compound curves or sharp right angles that exceed the film's flexibility. When vinyl is forced around tight contours without adequate heat relief, the material's internal memory pulls it back toward its original flat shape, overpowering the adhesive bond. Using thinner cast vinyl or trimming the perimeter away from sharp edges avoids this issue entirely.
Removing old vinyl stickers without damaging underlying paint or plastic requires controlled warmth and deliberate peeling angles. Warming the vinyl gently with a hair dryer softens hardened acrylic glue, allowing you to peel the sticker back smoothly against itself at a sharp one-hundred-and-eighty-degree angle rather than pulling straight upward away from the surface.
Any sticky residue left behind on metal, glass, or finished wood can be dissolved safely using an orange-oil-based adhesive remover or a dab of rubbing alcohol. Apply the solvent with a cloth, let it penetrate the adhesive layer for several minutes, and wipe the softened residue away gently without scratching the underlying substrate.
Published 2026-09-20 · reviewed with each rebuild, last September 2026.
Find places to print near you
The directory lists 23,804 places to print by state and city — pick your state or use the “Near me” button in the header.
More guides
-
 Service
Where to Get Passport and Visa Photos Taken: Costs and Specs
-
 Service
What Collating and Kitting Mean in Commercial Printing
-
 Service
Choosing Where to Print Your Digital Photos: Online Labs vs. Neighborhood Stores
-
 Buying
Standard Business Card Sizes, Stock Thickness, and Printing Costs
-
 Buying
Choosing the Right Custom T-Shirt Printing Method and Understanding Costs
-
 Service
A Practical Guide to Printing Digital Files, Fixing Common Output Errors, and Preparing Custom Media
-
 Buying
Understanding Sticker Cutting Styles: Die Cut, Kiss Cut, and Custom Formats
-
 Buying
How to Order Custom Canvas Prints: Materials, Sizes, and Costs
-
 Buying
Business Card Printing: Design, Templates, Finishes, and Local Vendors
-
 Buying
Custom T-Shirt Printing Guide: Screen Printing, DTG, and Ordering in Bulk
-
 Service
A Guide to Photo Printing, Passport Photos, and Custom Photo Books
-
 Buying
Digital and Physical Gift Cards: Buying, Printing, and Custom Solutions
-
 Buying
Custom Event Invitations: Graduation, Wedding, and Party Announcements
-
 Buying
Custom Canvas Prints: Framing Options, Wall Art Sizes, and Collage Design
-
 Service
Online Fax Services: Sending and Receiving Digital Faxes Without a Landline
-
 Buying
Custom Embroidered Patches, Clothing Badges, and Hat Embroidery
-
 Service
International Shipping Services: Comparing DHL, USPS, UPS, and FedEx
-
 Buying
Custom Drinkware and Water Bottle Printing Guide
-
 Buying
Custom Rubber Stamps and Self-Inking Stamp Guide
-
 Buying
Guide to Personalized Wrapping Paper and Custom Gift Packaging
-
 Buying
Custom Banners, Table Covers, and Trade Show Displays: Materials, Hardware, and Setup
-
 Service
Custom Apparel, Embroidery, and Patch Production Guide
-
 Buying
Custom Playing Cards and Deck Printing Buying Guide
-
 Service
Custom Greeting and Holiday Card Printing Guide
-
 Owning
Custom Vehicle Magnets and Bumper Stickers: Thickness, Durability, and Finish Guide